
Our first design challenge
I am excited to present our first design challenge, Modern Bath Design. For starters I would like to say I apologize for the video qualities, I am brand new to posting on Youtube. Most of my experience is having meetings online not designing in a free space (You could almost say its a design challenge for me). This is our first ever 3D Home Designs Design challenge and we are going to tackle Modern Bathroom design. A second thing I would like to mention is all of my design challenges will be recorded live. I am not doing any editing or voice overs so the recording preserves the changes and challenges from this one session. Current projects use our interactive home design meetings. This archived recording shows one unscripted concept-development session with 3D Home Designs. It should not be treated as a promise of pace or outcome for another project. After hearing the video I went and purchased a new microphone so I am hoping future videos will be a bit clearer for you to understand. Take a look at our video and see what it is like to see your room come to life before your eyes.
Modern Bath Design – Part 1
Video transcript and visual description
Speaker: Aaron, 3D Home Designs. Running time: 15 minutes, 30 seconds.
The recording is a narrated screen demonstration. Aaron works in a residential 3D design application while placing and editing walls, cabinets, sinks, plumbing fixtures, finishes, a shower, a window, and a freestanding tub. The reviewed text below corrects names and technical terms that the video's auto-generated English captions may misidentify.
Read the reviewed transcript
0:00–0:46 Challenge and project criteria
Aaron: Hello, everybody, and welcome to Interactive 3D Home Designs' first design challenge. You can read more at 3DHomeDesigns.com. The goal is to create a primary bathroom as new construction, without an existing-remodel constraint. It needs two vanities, including knee space for makeup; a “car-wash” shower with two showerheads; an enclosed water closet; no more than 300 square feet; and a modern style.
0:46–2:38 Entry and water closet
Visual: The plan is shown from above. Aaron draws the water-closet walls near the bedroom entry, places a toilet and wall cabinet, and changes the door to a pocket door.
Aaron: First I am deciding where the entry from the bedroom should be. We will place it on the left wall so we can reorient the room as needed. I try to put the toilet fairly close to the primary bedroom so it is easy to reach at night. We will use a Kohler Veil toilet, which fits the style, and a wall cabinet above it. I am changing some defaults to suit the modern style. We will use a pocket door and give the room a little extra space. A water closet does not usually need more than about five feet, but this is a larger bathroom, so I will make it slightly larger and use a 32-inch door for comfort.
2:38–5:31 Floating vanity and makeup space
Visual: Cabinets are placed along a wall, raised off the floor, duplicated, and resized. Aaron adds two rectangular sinks, drawers, and an open section with a waterfall counter edge.
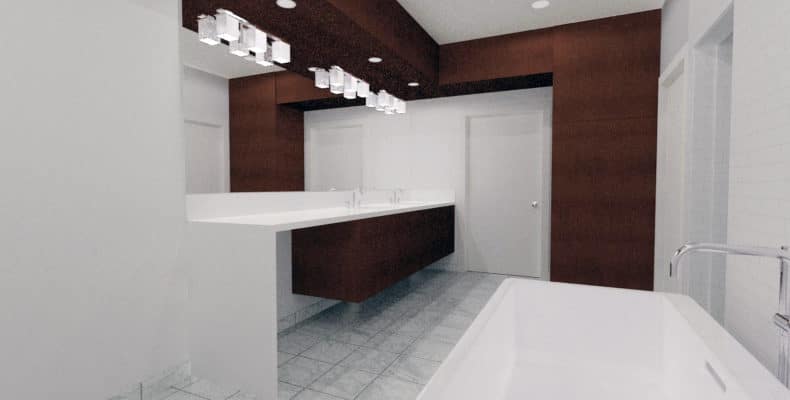
Aaron: For a modern style, the vanity cabinets will be wall-mounted with clean lines instead of sitting on the floor. I will set them to 26 inches, keep a flat countertop edge, remove the toe kick, and use a pop-latch door style so hardware is not required. I do not like placing plumbing fixtures against the wall because it leaves the user no space, so I will begin with an 18-inch cabinet as a buffer. We will use a rectangular Kohler Verticyl undermount sink and drawers for more useful storage. The challenge requires knee space, so I will extend the counter, run support below it, and create a waterfall edge. About three feet gives flexibility for a chair or bench.
5:31–8:33 Faucets, height, finishes, backsplash, and mirror
Visual: Faucets appear above the sinks. The vanity is raised, the counter becomes white, the cabinet fronts take on a stained wood finish, a backsplash wraps the wall, and a large mirror is added.
Aaron: I considered two faucet options and will use a widespread counter-mounted faucet. A homeowner could compare both because switching them in the model takes only a few seconds. I forgot the vanity height, so I will raise everything—eight inches; I apologize, I meant ten inches—to create the proper floating height. The counter will be pure white, with stained poplar cabinets for contrast. Poplar takes stain well and provides many options. I like to wrap the backsplash at the side; a six-inch backsplash can hold a horizontal electrical outlet without cutting into the mirror. I will use a slab mirror to make the room feel larger. I am changing the ceiling from ten feet to nine feet. The vanity still needs sconces later, but it is taking shape.
8:33–10:34 Tile and initial shower layout
Visual: The flooring changes to large, light marble-look tile. Aaron switches to a slab door, carries tile up as a base, and extends a wall to form the shower.
Aaron: We will use a Calacatta Gold floor and a slab door to keep the clean look. I prefer using the floor tile as the baseboard in a bathroom because it creates a better transition than a traditional baseboard. Next we need to locate the freestanding soaking tub and car-wash shower. Running the shower along the first wall would offset the entrances, so a better choice is to extend this wall and place the walk-in shower here. The water closet is 3 feet 10 inches wide. The challenge allows up to 300 square feet, and the design is currently only about 210 square feet.
10:34–12:31 Open shower, controls, and benches
Visual: Two open shower entries are created. Aaron places two shower fixtures and controls, then adds small teak benches at opposite corners.
Aaron: Many car-wash showers leave both entries open. We will create an opening at each end so the homeowner can enter from either side. I will add a showerhead on each side and independent thermostatic controls. Removable teak benches will go in the corners rather than built-in benches. At about 24 by 20 inches, each provides enough room without taking over the shower. The shower is roughly five feet deep and four feet across at each end, with a long shared center area.
12:31–13:54 Clerestory window and privacy
Visual: A wide, short window is placed high on the shower wall and resized.
Aaron: I would like natural light in the shower, so I am adding a clerestory window. It will be about five feet wide and 1 foot 6 inches tall, with the header at eight feet. A textured, frosted, or ripple glass can preserve privacy while admitting light.
13:54–15:30 Tub study and close
Visual: Aaron places a Kohler Réve freestanding tub, rotates the view, switches to a top-down plan, and tests spacing between the vanity, tub, and shower.
Aaron: The shower is about ten feet wide, so now I am considering the freestanding tub. I am trying a Kohler Réve tub because its shape fits the modern style. I need to check clearances and how the tub relates to the vanity and shower. From the top view, this first placement feels too tight, so I will pause here and revisit the tub layout in the next part. Thank you for watching Part 1 of the modern bathroom design challenge.
Modern Bathroom Design
First Few Steps
- Step 1
- Our first step was to create the entrance point. Where is the door to the master bathroom? We have to have a starting point and this allows us to dictate the flow of the room. In most remodels you are limited on its position but in new construction you have a lot more flexibility.
- Step 2
- Our goal here was to try to place your water closet next to the master bedroom door. Nobody wants to walk a long distance if they have to go in the middle of the night.
- Step 3
- Our next step was to create the vanity cabinets. We placed them across from the water closet and the entrance to the master bedroom to allow for easy access. Because this challenge included a knee space we added a waterfall edge off of the side of the vanity. The seamless use of the waterfall edge gives a nice finished edge to the vanity. It also gives you plenty of space to place any kind of seat under it that you wish.
- Note*
- If this were a remodel, steps 2-3 can change depending upon where existing plumbing is and the space that the client has. In new construction if you can change the location of the walls it gives you a lot more flexibility with the placement.
That is as far as we got in the 15 minute intro of our modern bathroom design challenge. In the coming days the design challenge will be completed. If you would like to see the final set of plans for the master bathroom and use them how you would like we will allow free access to the documents. Below you will find a list of selections that we have started using for this project. If you have any questions about our design or would like to see any future designs please Send current project details and let us know.
Next Step – Modern Bath Design Challenge Final
Our primary reason for showing these design challenges to you is to showcase the unique opportunity we offer our clients. Why spend hours in back and forth e-mails, red lining drawings, and trying to communicate your ideas over the phone when you can design in real time. In our next Design Challenge episode we will most likely be finalizing the modern master bathroom plan. The next steps we will be covering will be to figure out the location of the tub as well as add the finishes in for the rest of the space. Keep an eye out for our next video that should be coming out in the next few weeks. After the design is complete you will have access to the full PDF’s of the project as well as all the materials that went into it.
Planning a current residential project?
Use the current service, process, pricing, and contact pages for scope, deliverables, timing, and inquiry expectations.
Follow the complete archived challenge
Review the starting criteria or continue from this recorded session to the finished concept plan.